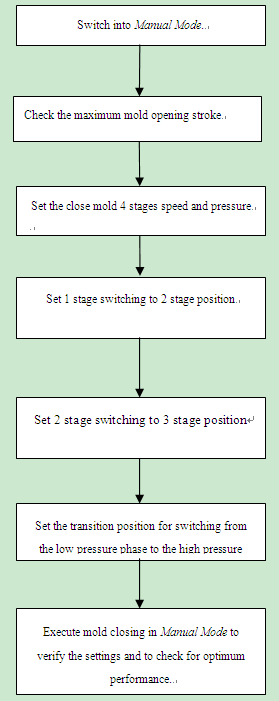
 There are 5 stages of pressure & speed controlled for mold closing: Mold Close Stage 1, Mold Close Stage 2, Low Pressure Mold Protection and High Pressure.For optimum productivity mold closing should be excecuted as fast as possible. However, it is important to preset correct data to ensure the protection of the plastic injection molds. For this reason pay particular attention to the Low Pressure Close mold part.
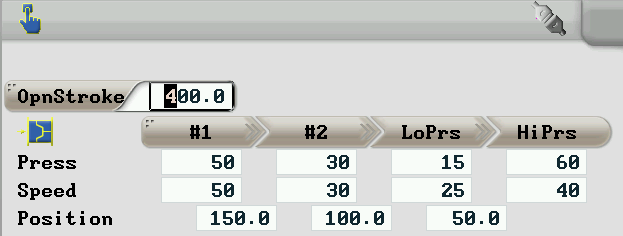
Press the Manual key  to activate the Manual mode . Switch the HMI display to the Clamp Setting screen by pressing F2
  mold platen key.
Check and set the Max. Mold opening stroke and ensure that it will not exceed this stroke.
Next, enter the desired speed and pressure for the 4 stages of mold closing. You have to ensure that the settings to allow for a smooth, jerk-free movement of the mold.
Set the speed low enough for the stage of Low Pressure Mold Protection to avoid any damage or jammed part remained in the mold. Therefore, set the lowest pressure possible.
The transition point for Mold Close Stage 2 switching into the stage of Low Pressure Mold Protection must be set before the position where the mold could possibility contact with a jammed part.
The transition point for the stage of Low Pressure Mold Protection switching into the stage of High Pressure must be at the position where the mold stationary and mold moving platen are able to touch together.
In order to accelerate the mold closing speed, you can activate the differential high-speed mold closing option for the High speed closing phase.
After set all the parameters for mold closing including the pressure, speed and position, please check the plastic molding machine in Manual mode for optimum machine performance. If you encounter any problems during the testing of mold closing, please press the Manual key  to stop the machine from operating.
